Dupa plasarea solicitării de comandă, in sectiunea Istoric puteti vedea cate solicitări de comandă mai avem de procesat inaintea dumneavoastra
Program de lucru: Luni - Vineri 9:00 - 18:00, pauza 13:00 - 14:00.
Se efectueaza lucrari de mentenanta la site si pot aparea erori. In cazul in care intampinati erori va rugam sa reincercati mai tarziu.
Ridicarea personala este disponibila pentru comenzile achitate in avans. Se pot ridica dupa ce sunt pregatite.
No products
 View larger
FM Radio Transmitter Module with LCD and USB
0104110000036513
New product
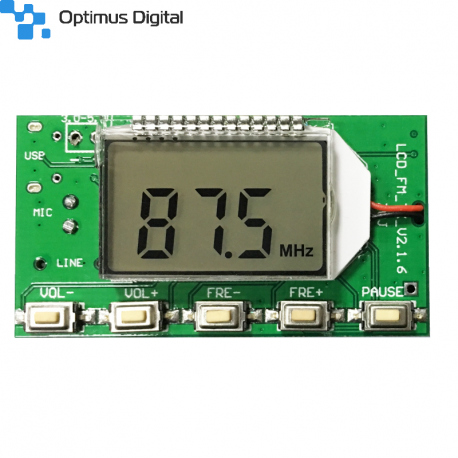
This mini FM transmitter can be used for wireless audio FM projects, short distance communication devices or USB PC audio broadcast. Uses DSP and PLL technologies to ensure high quality broadcasting. It also has an LCD screen with backlight and 4 buttons so it can be easily used.
See description for more details about the product.
Add to cart now!
2 Items
Warning: Last items in stock!
- Write a review
- Remove this product from my favorite's list.
- Add this product to my list of favorites.
More info
Description and specifications
- DSP and PLL (Digital Signal Processing / Phase-Locked Loop) technologies
- LCD with blue backlight
- USB inputs / Audio microphone (level adjustment with 30 steps)
- Transmission frequencies: 87.0MHz-108.00MHz (close campus broadcast), 76.0MHz-108.0MHz (open campus broadcast)
- Output power: 100mW
- Frequency response range: 50Hz-18KHz
- Working voltage: 3V-5V DC
- Working current: 35mA
Use with computer on USB interface
When the module is connected to the computer, it will recognize it and automatically install the necessary drivers. The module will be recognized as an audio card, so you can set the computer's audio output to USB so that it can be transmitted via radio waves.
With the help of this transmitter you can carry out various projects (F M wireless audio, short distance communication or for USB PC audio broadcast.
USB Cable is not included in price.
Instructions for use:
<1>: power supply
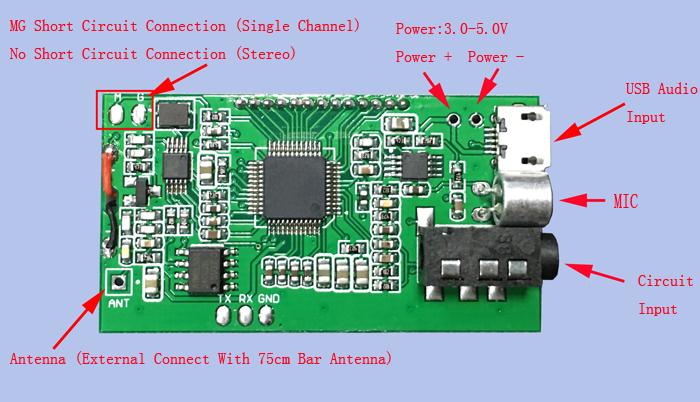
The corresponding ports of the module - and + are respectively connected to the negative and positive poles of the power supply (battery). It is recommended to use a battery or other regulated power supply for the power supply. Do not use switching power supplies without filters (such as mobile phone chargers, and other low-quality switching power supplies), otherwise the interference generated by the power supply will affect the normal operation of this module. The normal working voltage of this module is 3.0-5.0V, and the power supply voltage should not exceed this range.
<2>: button
Volume +/-: short press volume +/- 1, long press continuous +/-
Frequency +/-: short press frequency +/- 0.1MHZ, long press continuous +/- 1MHZ
Mute: Short press to switch mute/non-mute
<3>: Antenna
The ANT port is used to connect the FM antenna. In order to transmit FM signals better, it is recommended to connect an external 75cm whip antenna, and there should be no obstacles around the antenna as much as possible.
<4>: USB audio connection
If you need the USB audio broadcast function of this module, you also need to connect the USB cable to the computer. The USB port is compatible with ordinary mobile phones, so you can use the mobile phone USB cable to connect the module to the computer. Because the computer USB has its own 5V output, it can directly use the USB port to provide power to the module by connecting the computer to the computer. After connecting to the computer USB, the module will automatically enter the PC audio broadcasting mode, the LCD screen will display the PC, and the computer will automatically install the driver, and name the sound card device of this module "CD002", enable it in the computer sound setting and Enable this "CD002" audio device, the computer system audio can be transmitted through this module in the form of FM frequency modulation, and the nearby radio frequency can be adjusted to match the transmission frequency of this module to listen to the computer system audio transmitted by this module.
<5>: LINE audio connection
If you need the LINE (line input) channel of this module as a sound source to transmit, just plug one end of the audio cable into the 3.5mm audio jack of this module, and the other end into your audio device (such as a mobile phone headphone jack). Automatically switch to LINE channel as the source of FM transmission. As long as the nearby FM radio is adjusted to match the transmission frequency of this module, the audio from the mobile phone can be heard.
<6>: FM wireless microphone
If you need the MIC of this module as a sound source to transmit, just unplug the LINE cable and USB cable (that is, LINE and USB are not connected), the module will automatically switch to the MIC channel as the FM sound source, this module comes with a high-sensitivity electret Stereo microphones can be used in wireless microphones, maternal and child monitoring, etc. as required. When using, pay attention to adjust the emission volume of this module to achieve the best sound pickup effect.
7>: Serial port control (don’t care about this part if you don’t use the serial port control function)
The module reserves a TTL level serial port control interface. The communication between the TTL serial port and this module needs to be connected to the UART_RX, UART_TX and GND of the module. An external MCU (single chip microcomputer) or computer serial port can be used to send instructions to control the related functions of the module. Note: Because the computer serial port level is not TTL level, it is necessary to connect the RS323 level to TTL level conversion device or use the USB to TTL level serial port module to communicate with this module when connecting to the computer for communication. Because the serial port command control module requires certain computer expertise, buyers who do not understand do not need to toss. All information can be found in the baby instructions, and the customer service does not provide technical guidance in this regard.
User-defined setting items:
1: Setting of backlight LED mode
In the power-off state, press and hold the up and down buttons at the same time to turn on the radio, and the display B1 means the backlight is always on, and B0 means the backlight is turned off for 20 seconds. The settings will take effect after restarting. (The factory default is set to turn off the backlight with a 20-second delay).
2: Turn on/off the campus broadcast frequency band
In the power-off state, press and hold the VOL+, VOL- button, then turn on the power and start the LCD display C1 means that the campus radio is on, C0 means that the campus radio frequency band is off, and the settings will take effect after restarting. (The factory default setting is to turn off the campus broadcast frequency band).
3: Stereo/mono transmission mode setting
There are two solder joints M and G on the back of the module. The two points are shorted for mono mode emission, and the two points are disconnected for stereo mode emission. (The factory default is stereo transmission). Note: In the stereo system, the audio source input to the module must be stereo and the radio is also stereo to achieve the stereo effect. (Don't take a single-speaker (mono) radio or the audio signal input to the module as mono and say why there is no stereo effect!).


